How to use the Annotation Tool#
The annotation tool is designed to be simple and straightforward to use. Primarily, one selects the particular dataset, subject, hemisphere, and annotation to be drawn using the control panel on the left then clicks on the images on the right side of the panel to edit the annotations.
Starting the Annotation Tool#
The previous section provides instructions on starting the tool
using the docker compose up command and connecting to
http://localhost:8181/. Once you have followed these
steps to start the tool, you should see some black on white text in your
browser: “The DrawFAVA Cortical Annotation Tool” plus a few comments below this
header.
The annotation tool can take a couple of minutes to load, during which time the browser may appear to be doing nothing; this is normal. If the tool is thinking (e.g., loading data or starting up), there is a small circle in the upper right corner of the browser window, just to the right of a tag labeled “Python 3 (ipykernel)”, that will be filled in as a dark gray disc. If the tool is not thinking and is instead sitting idle, this circle will not be filled in and will apear as a hollow circle. In general, if your annotation tool stops thinking without starting the interface, then something has gone wrong.
If the annotation tool stops thinking without starting the interface or if it takes more than about 5 minutes to start the interface, then it is likely that something has gone wrong. The first thing to try in this case is to just reload the browser page. Occasionally, a small hiccup occurs somewhere in the pipeline used by the annotation tool and reloading the page will fix it. If this doesn’t fix the tool, however, please get in touch with Noah Benson or Kelly Chang (see the DrawFava team page for contact information).
Navigating the Annotation Tool#
Once the annotation tool has started, you should see an interface that looks approximately like the following image (Fig. 9).
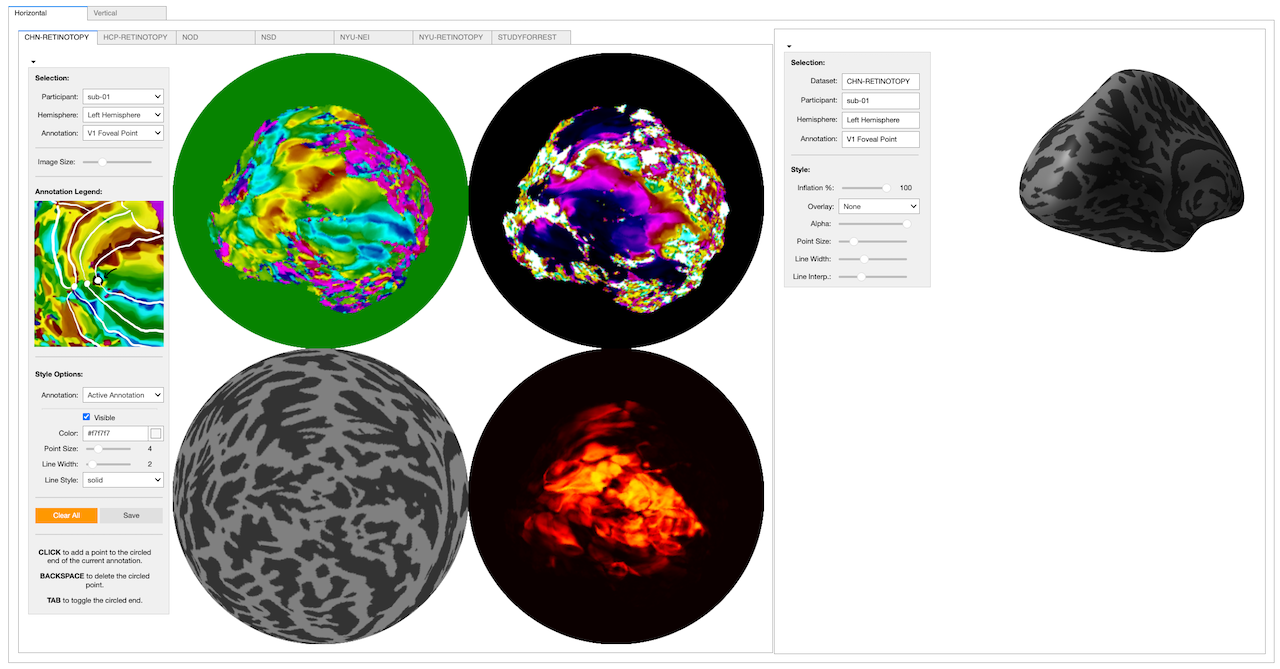
Figure 9. and (2) the 3D panel on the right. The 2D panel is the main interface for drawing and editing annotations. The 3D panel is primarily for visualizing the annotations on 3D. Each of the two panels has a collapsible control panel on the left that allows one to select the participant, hemisphere, and annotation currently being provided as well as to configure various visual properties of the tool. The 2D panel contains four flattened orthographic projections of the inflated spherical hemisphere, each with a different colormap showing different data: polar angle and eccentricity for the first two and curvature and the fraction of variance in the BOLD signal explained by the PRF parameters in the last two.#
The tool contains both a 2D and a 3D viewing panel that can either be visualized side-by-side with the 3D panel on the right, as shown in Figure 9, or stacked with the 3D panel on the bottom. Either way, the 3D panel is strictly for viewing the annotations, which must be drawn and edited on the 2D panel.
The 2D panel shows flattened projections of the 3D surface of th brain that place the occipital pole (the very back/posterior point of cortex) at the center. All four of the projections shown in the 2D panel at any given time are the same projection, just different data. For most annotations, the 2D panel will show the polar angle (upper left), eccentricity (upper right), surface curvature (lower left), and coefficient of determination (lower right). The coefficient of determination is effectively a measurement of how confident we are that a particular position on cortex responds to a visual stimulus.
The tabs along the top of the 2D panel allow one to select a specific dataset to annotate. Once a dataset has been selected, the dropdown menus in the control panel for the 2D panel can be used to select a specific participant and hemisphere to annotate. The “Annotation” dropdown menu allows one to select the annotation that one is currently drawing or editing.
Editing Annotations#
Once an annotation has been selected using the dropdown menus on the left side of the 2D viewing panel, the annotation may be edited by clicking on the 2D maps. All 2D maps that are displayed in the 2D viewer show the same projection, and it does not matter which map one clicks on. As one clicks on points, they will appear on the 3D brain as well.
If you make a mistake, the DELETE or BACKSPACE button should delete the selected point. To cycle through the points, allowing one to insert a new point at any position along the annotation, press TAB.
When you are finished editing an annotation, you can click the “Save” button in the 2D control panel.
Synchronizing Your Annotations to GitHub#
Once you have made one or more annotations, you can upload these annotations to
GitHub. Until you do this, the annotations can be lost by, for example,
deleting the drawFAVA directory on your computer. To upload the annotations,
we will use the git command in a terminal. You will need to either open a new
terminal or quit the annotation tool in order to enter the required commands
(either press CONTROL + c in the terminal you used to start the annotation tool
or use the annotation tool menu to navigate to “File > Close and Halt”).
Make sure you’re in the right directory!
If you open a new terminal, first make sure that you are in the drawFAVA
directory that you use to run the annotation tool. For example, if you cloned
your drawFAVA GitHub repository into your ~/Desktop directory, you’ll need
to cd into that directory first:
cd Desktop
cd drawFAVA
You can check whether you are in the right directory by running the pwd
command, which will print your working directory. This should end with
/drawFAVA.
Once you are in a terminal that is in the drawFAVA directory that you’ve been
using to run the tool (i.e., this is the directory from which you run
docker compose up), then you are ready to upload your edits. To perform the
uploads, run the following command:
bash sync.sh
sync.sh: File not found
If you get a File not found message when you run bash sync.sh, this means
you need to syncronize your repository manually. You can do this using the
following commands, which must be run from in the drawFAVA directory. (You
may want to copy-and-paste the first one.)
curl https://raw.githubusercontent.com/nbenlab/drawFAVA/refs/heads/main/sync.sh -o sync.sh
bash sync.sh
rm sync.sh
These commands (1) download the sync.sh script manually, (2) run the script
to syncronize your annotations, and (3) remove the script. You have to remove
the script because otherwise it can cause problems when you update your
repository.
You should ideally run this synchronization command after every session you spend editing contours. There is no downside to synchronizing frequently, and once annotations are synchronized, they cannot be lost.
Updating Your Repository#
On occasion, there are updates to the software that we use. These updates are
made in the nbenlab/drawFAVA GitHub repository—the repository from which your
drawFAVA repository was forked. To update your repository with these changes,
you must synchronize your repository with the nbenlab repository. This can
be done using the update.sh script in the repository.
To use the update.sh script, you must be in your drawFAVA directory. You
should always synchronize your annotations using the sync.sh script before
you update your repository because uncommitted changed can complicate an
update. While you are in the drawFAVA directory, run the following command:
bash update.sh
This script can produce a fair amount of output, and that is normal as long as it doesn’t end with an error message.
update.sh: File not found
If you get a File not found message when you run bash update.sh, this means
you need to syncronize your repository manually. You can do this using the
following commands, which must be run from in the drawFAVA directory. (You
may want to copy-and-paste the first one).
curl https://raw.githubusercontent.com/nbenlab/drawFAVA/refs/heads/main/update.sh -o upd.sh
bash upd.sh
rm upd.sh
These commands (1) download the update.sh script manually but names it
upd.sh instead of update.sh, (2) run the script, which updates your
repository from the nbenlab/drawFAVA repository, then (3) remove the
script. The script must be named something other than update.sh initially
because the update itself will create the update.sh script, and if there
already is such a script, it can cause problems. You can then remove the
upd.sh script because it’s no longer needed.
You only need to run the update.sh script when you have reason to believe
that there are updates waiting for you. However, there’s no harm in running
it when there aren’t updates available.